抱歉,您的浏览器无法访问本站

本页面需要浏览器支持(启用)JavaScript


了解详情 >

1 什么是 timm 库?

PyTorchImageModels,简称 timm,是一个巨大的 PyTorch 代码集合,包括了一系列:

image models

layers

utilities

optimizers

schedulers

data-loaders / augmentations

training / validation scripts

旨在将各种 SOTA 模型整合在一起,并具有复现 ImageNet 训练结果的能力。

作者github链接:https://github.com/rwightman

timm库链接:https://github.com/rwightman/pytorch-image-models

所有的PyTorch模型及其对应arxiv链接如下:

  • Big Transfer ResNetV2 (BiT) - https://arxiv.org/abs/1912.11370
  • CspNet (Cross-Stage Partial Networks) - https://arxiv.org/abs/1911.11929
  • DeiT (Vision Transformer) - https://arxiv.org/abs/2012.12877
  • DenseNet - https://arxiv.org/abs/1608.06993
  • DLA - https://arxiv.org/abs/1707.06484
  • DPN (Dual-Path Network) - https://arxiv.org/abs/1707.01629
  • EfficientNet (MBConvNet Family)
  • ​ EfficientNet NoisyStudent (B0-B7, L2) - https://arxiv.org/abs/1911.04252
  • ​ EfficientNet AdvProp (B0-B8) - https://arxiv.org/abs/1911.09665
  • ​ EfficientNet (B0-B7) - https://arxiv.org/abs/1905.11946
  • ​ EfficientNet-EdgeTPU (S, M, L) - https://ai.googleblog.com/2019/08/efficientnet-edgetpu-creating.html
  • ​ FBNet-C - https://arxiv.org/abs/1812.03443
  • ​ MixNet - https://arxiv.org/abs/1907.09595
  • ​ MNASNet B1, A1 (Squeeze-Excite), and Small - https://arxiv.org/abs/1807.11626
  • ​ MobileNet-V2 - https://arxiv.org/abs/1801.04381
  • ​ Single-Path NAS - https://arxiv.org/abs/1904.02877
  • GPU-Efficient Networks - https://arxiv.org/abs/2006.14090
  • HRNet - https://arxiv.org/abs/1908.07919
  • Inception-V3 - https://arxiv.org/abs/1512.00567
  • Inception-ResNet-V2 and Inception-V4 - https://arxiv.org/abs/1602.07261
  • MobileNet-V3 (MBConvNet w/ Efficient Head) - https://arxiv.org/abs/1905.02244
  • NASNet-A - https://arxiv.org/abs/1707.07012
  • NFNet-F - https://arxiv.org/abs/2102.06171
  • NF-RegNet / NF-ResNet - https://arxiv.org/abs/2101.08692
  • PNasNet - https://arxiv.org/abs/1712.00559
  • RegNet - https://arxiv.org/abs/2003.13678
  • RepVGG - https://arxiv.org/abs/2101.03697
  • ResNet/ResNeXt
  • ​ ResNet (v1b/v1.5) - https://arxiv.org/abs/1512.03385
  • ​ ResNeXt - https://arxiv.org/abs/1611.05431
  • ​ 'Bag of Tricks' / Gluon C, D, E, S variations - https://arxiv.org/abs/1812.01187
  • ​ Weakly-supervised (WSL) Instagram pretrained / ImageNet tuned ResNeXt101 - https://arxiv.org/abs/1805.00932
  • ​ Semi-supervised (SSL) / Semi-weakly Supervised (SWSL) ResNet/ResNeXts - https://arxiv.org/abs/1905.00546
  • ​ ECA-Net (ECAResNet) - https://arxiv.org/abs/1910.03151v4
  • ​ Squeeze-and-Excitation Networks (SEResNet) - https://arxiv.org/abs/1709.01507
  • Res2Net - https://arxiv.org/abs/1904.01169
  • ResNeSt - https://arxiv.org/abs/2004.08955
  • ReXNet - https://arxiv.org/abs/2007.00992
  • SelecSLS - https://arxiv.org/abs/1907.00837
  • Selective Kernel Networks - https://arxiv.org/abs/1903.06586
  • TResNet - https://arxiv.org/abs/2003.13630
  • Vision Transformer - https://arxiv.org/abs/2010.11929
  • VovNet V2 and V1 - https://arxiv.org/abs/1911.06667
  • Xception - https://arxiv.org/abs/1610.02357
  • Xception (Modified Aligned, Gluon) - https://arxiv.org/abs/1802.02611
  • Xception (Modified Aligned, TF) - https://arxiv.org/abs/1802.02611

2 timm库特点:

所有的模型都有默认的API:

  • ​ accessing/changing the classifier - get_classifier and reset_classifier
  • ​ 只对features做前向传播 - forward_features

所有模型都支持多尺度特征提取 (feature pyramids) (通过create_model函数):

  • create_model(name, features_only=True, out_indices=..., output_stride=...)

out_indices 指定返回哪个feature maps to return, 从0开始,out_indices[i]对应着 C(i + 1) feature level。

output_stride 通过dilated convolutions控制网络的output stride。大多数网络默认 stride 32 。

所有的模型都有一致的pretrained weight loader,adapts last linear if necessary。

训练方式支持:

  • NVIDIA DDP w/ a single GPU per process, multiple processes with APEX present (AMP mixed-precision optional)

  • PyTorch DistributedDataParallel w/ multi-gpu, single process (AMP disabled as it crashes when enabled)

  • PyTorch w/ single GPU single process (AMP optional)

动态的全局池化方式可以选择:average pooling, max pooling, average + max, or concat([average, max]),默认是adaptive average。

Schedulers:

Schedulers 包括step,cosinew/ restarts,tanhw/ restarts,plateau 。

Optimizer:

  • rmsprop_tf adapted from PyTorch RMSProp by myself. Reproduces much improved Tensorflow RMSProp behaviour.

  • radam by Liyuan Liu (https://arxiv.org/abs/1908.03265)

  • novograd by Masashi Kimura (https://arxiv.org/abs/1905.11286)

  • lookahead adapted from impl by Liam (https://arxiv.org/abs/1907.08610)

  • fused optimizers by name with NVIDIA Apex installed

  • adamp and sgdp by Naver ClovAI (https://arxiv.org/abs/2006.08217)

  • adafactor adapted from FAIRSeq impl (https://arxiv.org/abs/1804.04235)

  • adahessian by David Samuel (https://arxiv.org/abs/2006.00719)

3 timm库 vision_transformer.py代码解读:

代码来自:

https://github.com/rwightman/pytorch-image-models/blob/master/timm/models/vision_transformer.py

对应的论文是ViT,是除了官方开源的代码之外的又一个优秀的PyTorch implement。

An Image Is Worth 16 x 16 Words: Transformers for Image Recognition at Scale https://arxiv.org/abs/2010.11929

另一篇工作DeiT也大量借鉴了timm库这份代码的实现:

Training data-efficient image transformers & distillation through attention https://arxiv.org/abs/2012.12877

vision_transformer.py:

代码中定义的变量的含义如下:

  • img_size:tuple类型,里面是int类型,代表输入的图片大小,默认是224。

  • patch_size:tuple类型,里面是int类型,代表Patch的大小,默认是16。

  • in_chans:int类型,代表输入图片的channel数,默认是3。

  • num_classes:int类型classification head的分类数,比如CIFAR100就是100,默认是1000。

  • embed_dim:int类型Transformer的embedding dimension,默认是768。

  • depth:int类型,Transformer的Block的数量,默认是12。

  • num_heads:int类型,attention heads的数量,默认是12。

  • mlp_ratio:int类型,mlp hidden dim/embedding dim的值,默认是4。

  • qkv_bias:bool类型,attention模块计算qkv时需要bias吗,默认是True。

  • qk_scale:一般设置成None就行。

  • drop_rate:float类型,dropout rate,默认是0。

  • attn_drop_rate:float类型,attention模块的dropout rate,默认是0。

  • drop_path_rate:float类型,默认是0。

  • hybrid_backbone:nn.Module类型,在把图片转换成Patch之前,需要先通过一个Backbone吗?默认是None。

  • 如果是None,就直接把图片转化成Patch。

  • 如果不是None,就先通过这个Backbone,再转化成Patch。

  • norm_layer:nn.Module类型,归一化层类型,默认是None。

1 导入必要的库和模型:

1
2
3
4
5
6
7
8
9
10
11
12
13
14
15
import math
import logging
from functools import partial
from collections import OrderedDict

import torch
import torch.nn as nn
import torch.nn.functional as F

from timm.data import IMAGENET_DEFAULT_MEAN, IMAGENET_DEFAULT_STD
from .helpers import load_pretrained
from .layers import StdConv2dSame, DropPath, to_2tuple, trunc_normal_
from .resnet import resnet26d, resnet50d
from .resnetv2 import ResNetV2
from .registry import register_model

2 定义一个字典,代表标准的模型,如果需要更改模型超参数只需要改变_cfg的传入的参数即可。

1
2
3
4
5
6
7
8
9
def _cfg(url='', **kwargs):
return {
'url': url,
'num_classes': 1000, 'input_size': (3, 224, 224), 'pool_size': None,
'crop_pct': .9, 'interpolation': 'bicubic',
'mean': IMAGENET_DEFAULT_MEAN, 'std': IMAGENET_DEFAULT_STD,
'first_conv': 'patch_embed.proj', 'classifier': 'head',
**kwargs
}

3 default_cfgs代表支持的所有模型,也定义成字典的形式:

  • vit_small_patch16_224里面的small代表小模型。

  • ViT的第一步要把图片分成一个个patch,然后把这些patch组合在一起作为对图像的序列化操作,比如一张224 × 224的图片分成大小为16 × 16的patch,那一共可以分成196个。所以这个图片就序列化成了(196, 256)的tensor。所以这里的:

  • 16:就代表patch的大小。

  • 224:就代表输入图片的大小。

  • 按照这个命名方式,支持的模型有:vit_base_patch16_224,vit_base_patch16_384等等。

后面的vit_deit_base_patch16_224等等模型代表DeiT这篇论文的模型。

1
2
3
4
5
6
7
8
9
10
11
12
13
14
15
16
17
18
19
20
21
22
23
24
25
26
27
28
29
30
31
32
33
34
35
36
37
38
39
40
41
42
43
44
45
46
47
48
49
50
51
52
53
54
55
56
57
58
59
60
61
62
63
64
65
66
67
68
69
70
71
72
73
74
75
76
77
78
79
80
81
82
83
84
default_cfgs = {
# patch models (my experiments)
'vit_small_patch16_224': _cfg(
url='https://github.com/rwightman/pytorch-image-models/releases/download/v0.1-weights/vit_small_p16_224-15ec54c9.pth',
),

# patch models (weights ported from official Google JAX impl)
'vit_base_patch16_224': _cfg(
url='https://github.com/rwightman/pytorch-image-models/releases/download/v0.1-vitjx/jx_vit_base_p16_224-80ecf9dd.pth',
mean=(0.5, 0.5, 0.5), std=(0.5, 0.5, 0.5),
),
'vit_base_patch32_224': _cfg(
url='', # no official model weights for this combo, only for in21k
mean=(0.5, 0.5, 0.5), std=(0.5, 0.5, 0.5)),
'vit_base_patch16_384': _cfg(
url='https://github.com/rwightman/pytorch-image-models/releases/download/v0.1-vitjx/jx_vit_base_p16_384-83fb41ba.pth',
input_size=(3, 384, 384), mean=(0.5, 0.5, 0.5), std=(0.5, 0.5, 0.5), crop_pct=1.0),
'vit_base_patch32_384': _cfg(
url='https://github.com/rwightman/pytorch-image-models/releases/download/v0.1-vitjx/jx_vit_base_p32_384-830016f5.pth',
input_size=(3, 384, 384), mean=(0.5, 0.5, 0.5), std=(0.5, 0.5, 0.5), crop_pct=1.0),
'vit_large_patch16_224': _cfg(
url='https://github.com/rwightman/pytorch-image-models/releases/download/v0.1-vitjx/jx_vit_large_p16_224-4ee7a4dc.pth',
mean=(0.5, 0.5, 0.5), std=(0.5, 0.5, 0.5)),
'vit_large_patch32_224': _cfg(
url='', # no official model weights for this combo, only for in21k
mean=(0.5, 0.5, 0.5), std=(0.5, 0.5, 0.5)),
'vit_large_patch16_384': _cfg(
url='https://github.com/rwightman/pytorch-image-models/releases/download/v0.1-vitjx/jx_vit_large_p16_384-b3be5167.pth',
input_size=(3, 384, 384), mean=(0.5, 0.5, 0.5), std=(0.5, 0.5, 0.5), crop_pct=1.0),
'vit_large_patch32_384': _cfg(
url='https://github.com/rwightman/pytorch-image-models/releases/download/v0.1-vitjx/jx_vit_large_p32_384-9b920ba8.pth',
input_size=(3, 384, 384), mean=(0.5, 0.5, 0.5), std=(0.5, 0.5, 0.5), crop_pct=1.0),

# patch models, imagenet21k (weights ported from official Google JAX impl)
'vit_base_patch16_224_in21k': _cfg(
url='https://github.com/rwightman/pytorch-image-models/releases/download/v0.1-vitjx/jx_vit_base_patch16_224_in21k-e5005f0a.pth',
num_classes=21843, mean=(0.5, 0.5, 0.5), std=(0.5, 0.5, 0.5)),
'vit_base_patch32_224_in21k': _cfg(
url='https://github.com/rwightman/pytorch-image-models/releases/download/v0.1-vitjx/jx_vit_base_patch32_224_in21k-8db57226.pth',
num_classes=21843, mean=(0.5, 0.5, 0.5), std=(0.5, 0.5, 0.5)),
'vit_large_patch16_224_in21k': _cfg(
url='https://github.com/rwightman/pytorch-image-models/releases/download/v0.1-vitjx/jx_vit_large_patch16_224_in21k-606da67d.pth',
num_classes=21843, mean=(0.5, 0.5, 0.5), std=(0.5, 0.5, 0.5)),
'vit_large_patch32_224_in21k': _cfg(
url='https://github.com/rwightman/pytorch-image-models/releases/download/v0.1-vitjx/jx_vit_large_patch32_224_in21k-9046d2e7.pth',
num_classes=21843, mean=(0.5, 0.5, 0.5), std=(0.5, 0.5, 0.5)),
'vit_huge_patch14_224_in21k': _cfg(
url='', # FIXME I have weights for this but > 2GB limit for github release binaries
num_classes=21843, mean=(0.5, 0.5, 0.5), std=(0.5, 0.5, 0.5)),

# hybrid models (weights ported from official Google JAX impl)
'vit_base_resnet50_224_in21k': _cfg(
url='https://github.com/rwightman/pytorch-image-models/releases/download/v0.1-vitjx/jx_vit_base_resnet50_224_in21k-6f7c7740.pth',
num_classes=21843, mean=(0.5, 0.5, 0.5), std=(0.5, 0.5, 0.5), crop_pct=0.9, first_conv='patch_embed.backbone.stem.conv'),
'vit_base_resnet50_384': _cfg(
url='https://github.com/rwightman/pytorch-image-models/releases/download/v0.1-vitjx/jx_vit_base_resnet50_384-9fd3c705.pth',
input_size=(3, 384, 384), mean=(0.5, 0.5, 0.5), std=(0.5, 0.5, 0.5), crop_pct=1.0, first_conv='patch_embed.backbone.stem.conv'),

# hybrid models (my experiments)
'vit_small_resnet26d_224': _cfg(),
'vit_small_resnet50d_s3_224': _cfg(),
'vit_base_resnet26d_224': _cfg(),
'vit_base_resnet50d_224': _cfg(),

# deit models (FB weights)
'vit_deit_tiny_patch16_224': _cfg(
url='https://dl.fbaipublicfiles.com/deit/deit_tiny_patch16_224-a1311bcf.pth'),
'vit_deit_small_patch16_224': _cfg(
url='https://dl.fbaipublicfiles.com/deit/deit_small_patch16_224-cd65a155.pth'),
'vit_deit_base_patch16_224': _cfg(
url='https://dl.fbaipublicfiles.com/deit/deit_base_patch16_224-b5f2ef4d.pth',),
'vit_deit_base_patch16_384': _cfg(
url='https://dl.fbaipublicfiles.com/deit/deit_base_patch16_384-8de9b5d1.pth',
input_size=(3, 384, 384), crop_pct=1.0),
'vit_deit_tiny_distilled_patch16_224': _cfg(
url='https://dl.fbaipublicfiles.com/deit/deit_tiny_distilled_patch16_224-b40b3cf7.pth'),
'vit_deit_small_distilled_patch16_224': _cfg(
url='https://dl.fbaipublicfiles.com/deit/deit_small_distilled_patch16_224-649709d9.pth'),
'vit_deit_base_distilled_patch16_224': _cfg(
url='https://dl.fbaipublicfiles.com/deit/deit_base_distilled_patch16_224-df68dfff.pth', ),
'vit_deit_base_distilled_patch16_384': _cfg(
url='https://dl.fbaipublicfiles.com/deit/deit_base_distilled_patch16_384-d0272ac0.pth',
input_size=(3, 384, 384), crop_pct=1.0),
}

4 FFN实现:

1
2
3
4
5
6
7
8
9
10
11
12
13
14
15
16
17
class Mlp(nn.Module):
def __init__(self, in_features, hidden_features=None, out_features=None, act_layer=nn.GELU, drop=0.):
super().__init__()
out_features = out_features or in_features
hidden_features = hidden_features or in_features
self.fc1 = nn.Linear(in_features, hidden_features)
self.act = act_layer()
self.fc2 = nn.Linear(hidden_features, out_features)
self.drop = nn.Dropout(drop)

def forward(self, x):
x = self.fc1(x)
x = self.act(x)
x = self.drop(x)
x = self.fc2(x)
x = self.drop(x)
return x

5 Attention实现:

  • 在python 3.5以后,@是一个操作符,表示矩阵-向量乘法

  • A@x 就是矩阵-向量乘法A*x: np.dot(A, x)。

1
2
3
4
5
6
7
8
9
10
11
12
13
14
15
16
17
18
19
20
21
22
23
24
25
26
27
28
class Attention(nn.Module):
def __init__(self, dim, num_heads=8, qkv_bias=False, qk_scale=None, attn_drop=0., proj_drop=0.):
super().__init__()
self.num_heads = num_heads
head_dim = dim // num_heads
# NOTE scale factor was wrong in my original version, can set manually to be compat with prev weights
self.scale = qk_scale or head_dim ** -0.5

self.qkv = nn.Linear(dim, dim * 3, bias=qkv_bias)
self.attn_drop = nn.Dropout(attn_drop)
self.proj = nn.Linear(dim, dim)
self.proj_drop = nn.Dropout(proj_drop)

def forward(self, x):
B, N, C = x.shape
qkv = self.qkv(x).reshape(B, N, 3, self.num_heads, C // self.num_heads).permute(2, 0, 3, 1, 4)
q, k, v = qkv[0], qkv[1], qkv[2] # make torchscript happy (cannot use tensor as tuple)

attn = (q @ k.transpose(-2, -1)) * self.scale
attn = attn.softmax(dim=-1)
attn = self.attn_drop(attn)

x = (attn @ v).transpose(1, 2).reshape(B, N, C)
x = self.proj(x)
x = self.proj_drop(x)

# x: (B, N, C)
return x

6 包含Attention和Add & Norm的Block实现:

图1:Block类对应结构

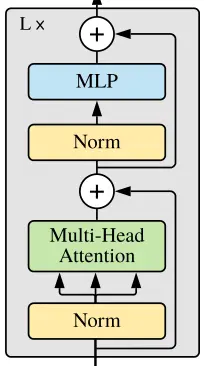
不同之处是: 先进行Norm,再Attention;先进行Norm,再通过FFN (MLP)。

class Block(nn.Module):

    def __init__(self, dim, num_heads, mlp_ratio=4., qkv_bias=False, qk_scale=None, drop=0., attn_drop=0.,
                 drop_path=0., act_layer=nn.GELU, norm_layer=nn.LayerNorm):
        super().__init__()
        self.norm1 = norm_layer(dim)
        self.attn = Attention(
            dim, num_heads=num_heads, qkv_bias=qkv_bias, qk_scale=qk_scale, attn_drop=attn_drop, proj_drop=drop)
        # NOTE: drop path for stochastic depth, we shall see if this is better than dropout here
        self.drop_path = DropPath(drop_path) if drop_path > 0. else nn.Identity()
        self.norm2 = norm_layer(dim)
        mlp_hidden_dim = int(dim * mlp_ratio)
        self.mlp = Mlp(in_features=dim, hidden_features=mlp_hidden_dim, act_layer=act_layer, drop=drop)

    def forward(self, x):
        x = x + self.drop_path(self.attn(self.norm1(x)))
        x = x + self.drop_path(self.mlp(self.norm2(x)))
        return x

7 接下来要把图片转换成Patch,一种做法是直接把Image转化成Patch,另一种做法是把Backbone输出的特征转化成Patch。

7.1直接把Image转化成Patch:

输入的x的维度是:(B, C, H, W) 输出的PatchEmbedding的维度是:(B, 14$\(14, 768),768表示embed_dim,14\)$14表示一共有196个Patches。

1
2
3
4
5
6
7
8
9
10
11
12
13
14
15
16
17
18
19
20
21
22
23
class PatchEmbed(nn.Module):
""" Image to Patch Embedding
"""
def __init__(self, img_size=224, patch_size=16, in_chans=3, embed_dim=768):
super().__init__()
img_size = to_2tuple(img_size)
patch_size = to_2tuple(patch_size)
num_patches = (img_size[1] // patch_size[1]) * (img_size[0] // patch_size[0])
self.img_size = img_size
self.patch_size = patch_size
self.num_patches = num_patches

self.proj = nn.Conv2d(in_chans, embed_dim, kernel_size=patch_size, stride=patch_size)

def forward(self, x):
B, C, H, W = x.shape
# FIXME look at relaxing size constraints
assert H == self.img_size[0] and W == self.img_size[1], \
f"Input image size ({H}*{W}) doesn't match model ({self.img_size[0]}*{self.img_size[1]})."
x = self.proj(x).flatten(2).transpose(1, 2)

# x: (B, 14*14, 768)
return x
7.2把Backbone输出的特征转化成Patch:
  • 输入的x的维度是:(B, C, H, W)

  • 得到Backbone输出的维度是:(B, feature_size, feature_size, feature_dim)

  • 输出的PatchEmbedding的维度是:(B, feature_size, feature_size, embed_dim),一共有feature_size * feature_size个Patches。

1
2
3
4
5
6
7
8
9
10
11
12
13
14
15
16
17
18
19
20
21
22
23
24
25
26
27
28
29
30
31
32
33
34
35
36
37
38
39
class HybridEmbed(nn.Module):
""" CNN Feature Map Embedding
Extract feature map from CNN, flatten, project to embedding dim.
"""
def __init__(self, backbone, img_size=224, feature_size=None, in_chans=3, embed_dim=768):
super().__init__()
assert isinstance(backbone, nn.Module)
img_size = to_2tuple(img_size)
self.img_size = img_size
self.backbone = backbone
if feature_size is None:
with torch.no_grad():
# FIXME this is hacky, but most reliable way of determining the exact dim of the output feature
# map for all networks, the feature metadata has reliable channel and stride info, but using
# stride to calc feature dim requires info about padding of each stage that isn't captured.
training = backbone.training
if training:
backbone.eval()
o = self.backbone(torch.zeros(1, in_chans, img_size[0], img_size[1]))
if isinstance(o, (list, tuple)):
o = o[-1] # last feature if backbone outputs list/tuple of features
feature_size = o.shape[-2:]
feature_dim = o.shape[1]
backbone.train(training)
else:
feature_size = to_2tuple(feature_size)
if hasattr(self.backbone, 'feature_info'):
feature_dim = self.backbone.feature_info.channels()[-1]
else:
feature_dim = self.backbone.num_features
self.num_patches = feature_size[0] * feature_size[1]
self.proj = nn.Conv2d(feature_dim, embed_dim, 1)

def forward(self, x):
x = self.backbone(x)
if isinstance(x, (list, tuple)):
x = x[-1] # last feature if backbone outputs list/tuple of features
x = self.proj(x).flatten(2).transpose(1, 2)
return x

8 以上是ViT所需的所有模块的定义,下面是VisionTransformer 这个类的实现:

8.1 使用这个类时需要传入的变量,其含义已经在本小节一开始介绍。
1
2
3
4
5
6
7
8
9
class VisionTransformer(nn.Module):
""" Vision Transformer

A PyTorch impl of : `An Image is Worth 16x16 Words: Transformers for Image Recognition at Scale` -
https://arxiv.org/abs/2010.11929
"""
def __init__(self, img_size=224, patch_size=16, in_chans=3, num_classes=1000, embed_dim=768, depth=12,
num_heads=12, mlp_ratio=4., qkv_bias=True, qk_scale=None, representation_size=None,
drop_rate=0., attn_drop_rate=0., drop_path_rate=0., hybrid_backbone=None, norm_layer=None):
8.2 得到分块后的Patch的数量:
1
2
3
4
5
6
7
8
9
10
11
12
super().__init__()
self.num_classes = num_classes
self.num_features = self.embed_dim = embed_dim # num_features for consistency with other models
norm_layer = norm_layer or partial(nn.LayerNorm, eps=1e-6)

if hybrid_backbone is not None:
self.patch_embed = HybridEmbed(
hybrid_backbone, img_size=img_size, in_chans=in_chans, embed_dim=embed_dim)
else:
self.patch_embed = PatchEmbed(
img_size=img_size, patch_size=patch_size, in_chans=in_chans, embed_dim=embed_dim)
num_patches = self.patch_embed.num_patches
8.3 class token:

一开始定义成(1, 1, 768),之后再变成(B, 1, 768)。

1
self.cls_token = nn.Parameter(torch.zeros(1, 1, embed_dim))
8.4 定义位置编码:
1
self.pos_embed = nn.Parameter(torch.zeros(1, num_patches + 1, embed_dim))
8.5 把12个Block连接起来:
1
2
3
4
5
6
7
8
9
self.pos_drop = nn.Dropout(p=drop_rate)

dpr = [x.item() for x in torch.linspace(0, drop_path_rate, depth)] # stochastic depth decay rule
self.blocks = nn.ModuleList([
Block(
dim=embed_dim, num_heads=num_heads, mlp_ratio=mlp_ratio, qkv_bias=qkv_bias, qk_scale=qk_scale,
drop=drop_rate, attn_drop=attn_drop_rate, drop_path=dpr[i], norm_layer=norm_layer)
for i in range(depth)])
self.norm = norm_layer(embed_dim)
8.6 表示层和分类头:

表示层输出维度是representation_size,分类头输出维度是num_classes。

1
2
3
4
5
6
7
8
9
10
11
12
# Representation layer
if representation_size:
self.num_features = representation_size
self.pre_logits = nn.Sequential(OrderedDict([
('fc', nn.Linear(embed_dim, representation_size)),
('act', nn.Tanh())
]))
else:
self.pre_logits = nn.Identity()

# Classifier head
self.head = nn.Linear(self.num_features, num_classes) if num_classes > 0 else nn.Identity()
8.7 初始化各个模块:

函数trunc_normal_(tensor, mean=0., std=1., a=-2., b=2.)的目的是用截断的正态分布绘制的值填充输入张量,我们只需要输入均值mean,标准差std,下界a,上界b即可。

self.apply(self._init_weights)表示对各个模块的权重进行初始化。apply函数的代码是:

1
2
3
4
for module in self.children():
module.apply(fn)
fn(self)
return self
  • 递归地将fn应用于每个子模块,相当于在递归调用fn,即_init_weights这个函数。

  • 也就是把模型的所有子模块的nn.Linear和nn.LayerNorm层都初始化掉。

1
2
3
4
5
6
7
8
9
10
11
12
trunc_normal_(self.pos_embed, std=.02)
trunc_normal_(self.cls_token, std=.02)
self.apply(self._init_weights)

def _init_weights(self, m):
if isinstance(m, nn.Linear):
trunc_normal_(m.weight, std=.02)
if isinstance(m, nn.Linear) and m.bias is not None:
nn.init.constant_(m.bias, 0)
elif isinstance(m, nn.LayerNorm):
nn.init.constant_(m.bias, 0)
nn.init.constant_(m.weight, 1.0)
8.8 最后就是整个ViT模型的forward实现:
1
2
3
4
5
6
7
8
9
10
11
12
13
14
15
16
17
18
19
20
def forward_features(self, x):
B = x.shape[0]
x = self.patch_embed(x)

cls_tokens = self.cls_token.expand(B, -1, -1) # stole cls_tokens impl from Phil Wang, thanks
x = torch.cat((cls_tokens, x), dim=1)
x = x + self.pos_embed
x = self.pos_drop(x)

for blk in self.blocks:
x = blk(x)

x = self.norm(x)[:, 0]
x = self.pre_logits(x)
return x

def forward(self, x):
x = self.forward_features(x)
x = self.head(x)
return x

9 下面是Training data-efficient image transformers & distillation through attention这篇论文的DeiT这个类的实现:

整体结构与ViT相似,继承了上面的VisionTransformer类。

1
class DistilledVisionTransformer(VisionTransformer):

再额外定义以下3个变量:

distillation token:dist_token 新的位置编码:pos_embed 蒸馏分类头:head_dist

1
2
3
4
self.dist_token = nn.Parameter(torch.zeros(1, 1, self.embed_dim))
num_patches = self.patch_embed.num_patches
self.pos_embed = nn.Parameter(torch.zeros(1, num_patches + 2, self.embed_dim))
self.head_dist = nn.Linear(self.embed_dim, self.num_classes) if self.num_classes > 0 else nn.Identity()

初始化新定义的变量:

1
2
3
trunc_normal_(self.dist_token, std=.02)
trunc_normal_(self.pos_embed, std=.02)
self.head_dist.apply(self._init_weights)

前向函数:

1
2
3
4
5
6
7
8
9
10
11
12
13
14
15
16
17
18
19
20
21
22
23
24
25
26
def forward_features(self, x):
B = x.shape[0]
x = self.patch_embed(x)

cls_tokens = self.cls_token.expand(B, -1, -1) # stole cls_tokens impl from Phil Wang, thanks
dist_token = self.dist_token.expand(B, -1, -1)
x = torch.cat((cls_tokens, dist_token, x), dim=1)

x = x + self.pos_embed
x = self.pos_drop(x)

for blk in self.blocks:
x = blk(x)

x = self.norm(x)
return x[:, 0], x[:, 1]

def forward(self, x):
x, x_dist = self.forward_features(x)
x = self.head(x)
x_dist = self.head_dist(x_dist)
if self.training:
return x, x_dist
else:
# during inference, return the average of both classifier predictions
return (x + x_dist) / 2

10 对位置编码进行插值:

posemb代表未插值的位置编码权值,posemb_tok为位置编码的token部分,posemb_grid为位置编码的插值部分。 首先把要插值部分posemb_grid给reshape成(1, gs_old, gs_old, -1)的形式,再插值成(1, gs_new, gs_new, -1)的形式,最后与token部分在第1维度拼接在一起,得到插值后的位置编码posemb。

1
2
3
4
5
6
7
8
9
10
11
12
13
14
15
16
17
18
def resize_pos_embed(posemb, posemb_new):
# Rescale the grid of position embeddings when loading from state_dict. Adapted from
# https://github.com/google-research/vision_transformer/blob/00883dd691c63a6830751563748663526e811cee/vit_jax/checkpoint.py#L224
_logger.info('Resized position embedding: %s to %s', posemb.shape, posemb_new.shape)
ntok_new = posemb_new.shape[1]
if True:
posemb_tok, posemb_grid = posemb[:, :1], posemb[0, 1:]
ntok_new -= 1
else:
posemb_tok, posemb_grid = posemb[:, :0], posemb[0]
gs_old = int(math.sqrt(len(posemb_grid)))
gs_new = int(math.sqrt(ntok_new))
_logger.info('Position embedding grid-size from %s to %s', gs_old, gs_new)
posemb_grid = posemb_grid.reshape(1, gs_old, gs_old, -1).permute(0, 3, 1, 2)
posemb_grid = F.interpolate(posemb_grid, size=(gs_new, gs_new), mode='bilinear')
posemb_grid = posemb_grid.permute(0, 2, 3, 1).reshape(1, gs_new * gs_new, -1)
posemb = torch.cat([posemb_tok, posemb_grid], dim=1)
return posemb

11 _create_vision_transformer函数用于创建vision transformer:

checkpoint_filter_fn的作用是加载预训练权重。

1
2
3
4
5
6
7
8
9
10
11
12
13
14
15
16
17
18
19
20
21
22
23
24
25
26
27
28
29
30
31
32
33
34
35
36
37
38
39
40
41
def checkpoint_filter_fn(state_dict, model):
""" convert patch embedding weight from manual patchify + linear proj to conv"""
out_dict = {}
if 'model' in state_dict:
# For deit models
state_dict = state_dict['model']
for k, v in state_dict.items():
if 'patch_embed.proj.weight' in k and len(v.shape) < 4:
# For old models that I trained prior to conv based patchification
O, I, H, W = model.patch_embed.proj.weight.shape
v = v.reshape(O, -1, H, W)
elif k == 'pos_embed' and v.shape != model.pos_embed.shape:
# To resize pos embedding when using model at different size from pretrained weights
v = resize_pos_embed(v, model.pos_embed)
out_dict[k] = v
return out_dict


def _create_vision_transformer(variant, pretrained=False, distilled=False, **kwargs):
default_cfg = default_cfgs[variant]
default_num_classes = default_cfg['num_classes']
default_img_size = default_cfg['input_size'][-1]

num_classes = kwargs.pop('num_classes', default_num_classes)
img_size = kwargs.pop('img_size', default_img_size)
repr_size = kwargs.pop('representation_size', None)
if repr_size is not None and num_classes != default_num_classes:
# Remove representation layer if fine-tuning. This may not always be the desired action,
# but I feel better than doing nothing by default for fine-tuning. Perhaps a better interface?
_logger.warning("Removing representation layer for fine-tuning.")
repr_size = None

model_cls = DistilledVisionTransformer if distilled else VisionTransformer
model = model_cls(img_size=img_size, num_classes=num_classes, representation_size=repr_size, **kwargs)
model.default_cfg = default_cfg

if pretrained:
load_pretrained(
model, num_classes=num_classes, in_chans=kwargs.get('in_chans', 3),
filter_fn=partial(checkpoint_filter_fn, model=model))
return model

12 定义和注册vision transformer模型:

@ register_model这个函数来自timm库model文件夹下的registry.py文件,它的作用是: @ 指装饰器 @register_model代表注册器,注册这个新定义的模型。 存储到_model_entrypoints这个字典中,比如:

1
_model_entrypoints[vit_base_patch16_224] = _create_vision_transformer('vit_base_patch16_224', pretrained=pretrained, **model_kwargs)

然后在factory.py的create_model函数中的下面这几行真正创建模型,你以后想创建的任何模型都会使用create_model这个函数,这里说清楚了为什么要用它:

1
2
3
4
5
6
7
if is_model(model_name):
create_fn = model_entrypoint(model_name)
else:
raise RuntimeError('Unknown model (%s)' % model_name)

with set_layer_config(scriptable=scriptable, exportable=exportable, no_jit=no_jit):
model = create_fn(pretrained=pretrained, **kwargs)

比如刚才在main.py里面用了create_model创建模型,如下面代码所示。而create_model就来自factory.py:

1
2
3
4
5
6
7
8
model = create_model(
args.model,
pretrained=False,
num_classes=args.nb_classes,
drop_rate=args.drop,
drop_path_rate=args.drop_path,
drop_block_rate=None,
)

一共可以选择的模型包括:

ViT系列: vit_small_patch16_224 vit_base_patch16_224 vit_base_patch32_224 vit_base_patch16_384 vit_base_patch32_384 vit_large_patch16_224 vit_large_patch32_224 vit_large_patch16_384 vit_large_patch32_384 vit_base_patch16_224_in21k vit_base_patch32_224_in21k vit_large_patch16_224_in21k vit_large_patch32_224_in21k vit_huge_patch14_224_in21k vit_base_resnet50_224_in21k vit_base_resnet50_384 vit_small_resnet26d_224 vit_small_resnet50d_s3_224 vit_base_resnet26d_224 vit_base_resnet50d_224

DeiT系列: vit_deit_tiny_patch16_224 vit_deit_small_patch16_224 vit_deit_base_patch16_224 vit_deit_base_patch16_384 vit_deit_tiny_distilled_patch16_224 vit_deit_small_distilled_patch16_224 vit_deit_base_distilled_patch16_224 vit_deit_base_distilled_patch16_384

以上就是对timm库 vision_transformer.py代码的分析。

4 如何使用timm库以及 vision_transformer.py代码搭建自己的模型?

在搭建我们自己的视觉Transformer模型时,我们可以按照下面的步骤操作:首先

继承timm库的VisionTransformer这个类。 添加上自己模型独有的一些变量。 重写forward函数。 通过timm库的注册器注册新模型。

我们以ViT模型的改进版DeiT为例:

首先,DeiT的所有模型列表如下:

1
2
3
4
5
6
__all__ = [
'deit_tiny_patch16_224', 'deit_small_patch16_224', 'deit_base_patch16_224',
'deit_tiny_distilled_patch16_224', 'deit_small_distilled_patch16_224',
'deit_base_distilled_patch16_224', 'deit_base_patch16_384',
'deit_base_distilled_patch16_384',
]

导入VisionTransformer这个类,注册器register_model,以及初始化函数trunc_normal_:

1
2
3
from timm.models.vision_transformer import VisionTransformer, _cfg
from timm.models.registry import register_model
from timm.models.layers import trunc_normal_

DeiT的class名称是DistilledVisionTransformer,它直接继承了VisionTransformer这个类:

1
class DistilledVisionTransformer(VisionTransformer):

添加上自己模型独有的一些变量:

1
2
3
4
5
6
7
8
9
10
11
def __init__(self, *args, **kwargs):
super().__init__(*args, **kwargs)
self.dist_token = nn.Parameter(torch.zeros(1, 1, self.embed_dim))
num_patches = self.patch_embed.num_patches
# 位置编码不是ViT中的(b, N, 256), 而变成了(b, N+2, 256), 原因是还有class token和distillation token.
self.pos_embed = nn.Parameter(torch.zeros(1, num_patches + 2, self.embed_dim))
self.head_dist = nn.Linear(self.embed_dim, self.num_classes) if self.num_classes > 0 else nn.Identity()

trunc_normal_(self.dist_token, std=.02)
trunc_normal_(self.pos_embed, std=.02)
self.head_dist.apply(self._init_weights)

重写forward函数:

1
2
3
4
5
6
7
8
9
10
11
12
13
@register_model
def deit_base_patch16_224(pretrained=False, **kwargs):
model = VisionTransformer(
patch_size=16, embed_dim=768, depth=12, num_heads=12, mlp_ratio=4, qkv_bias=True,
norm_layer=partial(nn.LayerNorm, eps=1e-6), **kwargs)
model.default_cfg = _cfg()
if pretrained:
checkpoint = torch.hub.load_state_dict_from_url(
url="https://dl.fbaipublicfiles.com/deit/deit_base_patch16_224-b5f2ef4d.pth",
map_location="cpu", check_hash=True
)
model.load_state_dict(checkpoint["model"])
return model

5 timm库 train.py代码解读:

timm库的训练使用结合apex支持的分布式训练,同步bn,以及混合精度的训练方式,其train.py的写法很具有代表性,值得拿出来讨论。因此这篇文章再多加一段,来专门讨论这个train.py。

结合apex支持的分布式训练,同步bn,以及混合精度的训练方式的详细讲解可以参考下面这篇文章:

https://zhuanlan.zhihu.com/p/353587472

在这篇文章中我们使用8步法结合apex支持的分布式训练,同步bn,以及混合精度:

5.1先罗列自己网络的参数:

1
2
3
4
5
6
7
def parse():
parser = argparse.ArgumentParser()
parser.add_argument('--local_rank', type=int, default=0)
...
...
args = parser.parse_args()
return args

local_rank指定了输出设备,默认为GPU可用列表中的第一个GPU。这里这个是必须加的。原因后面讲

5.2在主函数中开头写:

1
2
3
4
5
6
7
8
def main():
args = parse()
torch.cuda.set_device(args.local_rank) # 必须写!,还必须在下一句的前面,
#torch.utils.launch也需要set_device, 所以必须写
torch.distributed.init_process_group(
'nccl',
init_method='env://'
)

5.3导入数据接口,这里有一点不一样。需要用一个DistributedSampler:

1
2
3
4
5
6
dataset = DAVIS2017(root, 'training')
num_workers = 4 if cuda else 0
# 多了一个DistributedSampler,作为dataloader的sampler
train_sampler = torch.utils.data.distributed.DistributedSampler(dataset)
loader = DataLoader(dataset,batch_size=batchsize,shuffle=False, num_workers=num_workers,pin_memory=cuda,
drop_last=True, sampler=train_sampler)

5.4之后定义模型:

1
2
3
4
5
6
net = XXXNet(using_amp=True)
net.train()
net = convert_syncbn_model(net) # 用apex支持的方法,使得普通bn成为同步bn。
# 切记在网络实现中,不要使用torch自带的SyncBatchnorm。
device = torch.device('cuda:{}'.format(args.local_rank))
net = net.to(device) # 把模型搬运到第一块GPU上

5.5定义优化器,损失函数,定义优化器一定要在把模型搬运到GPU之后:

1
2
3
opt = Adam([{'params': params_low_lr, 'lr': 4e-5},
{'params': params_high_lr, 'lr': 1e-4}], weight_decay=settings.WEIGHT_DECAY)
crit = nn.BCELoss().to(device)

5.6多GPU设置:

1
2
3
net, opt = amp.initialize(net, opt, opt_level="O1")  # 字母小写o,不是零。
# 关于initialize用法,见上一篇博客。
net = DDP(net, delay_allreduce=True) # 必须在initialze之后

5.7记得loss要这么用:

1
2
3
4
5
opt.zero_grad()
# loss.backward()
with amp.scale_loss(loss, opt) as scaled_loss:
scaled_loss.backward()
opt.step()

5.8然后在代码底部加入:

1
2
if __name__ == '__main__':
main()

那么这个train.py大体上依然遵循这8步:

https://github.com/rwightman/pytorch-image-models/blob/master/train.py

总结

本文简要介绍了优秀的PyTorch Image Model 库:timm库以及其中的 vision transformer 代码和训练代码。 Transformer 架构早已在自然语言处理任务中得到广泛应用,但在计算机视觉领域中仍然受到限制。在计算机视觉领域,目前已有大量工作表明模型对 CNN 的依赖不是必需的,当直接应用于图像块序列时,transformer 也能很好地执行图像分类任务。本文的目的是为学者介绍一个优秀的 vision transformer 的PyTorch实现,以便更快地开展相关实验。

评论